So, you’ve used the Notion API to build a really cool thing, and you want to share it with the world. To do that, you need to turn your internal integration which uses one fixed token into a public integration that gets tokens for individual users using the OAuth 2.0 protocol. This post will show an example of how to do that in a Django application, though much of this code will also be applicable to any other Python web framework.
We’ll do this using the oauthlib library to help with some of the OAuth logic. oauthlib helps us build and validate URLs and request bodies for the OAuth protocol, while providing the flexibility needed to handle some extra information returned by Notion.
In Part 2, we make this a more fully functional and secure starter for an application, and save the token and call an API.
OAuth 2.0 Overview #
Notion uses a standard protocol designed for authorizing specific access to user data by 3rd party apps, known as OAuth 2.0. Specifically, it uses the OAuth 2.0 Authorization Code Grant. This flow is designed for web apps with a server side component, like a Django app, and involves both browser redirects and making API calls. If you want to dive really deep, you can read the full spec: rfc6749: The OAuth 2.0 Authorization Framework.
The spec uses some extremely generalized terms for the people and software involved in the OAuth 2.0 flows, which can be a bit confusing. In this example, they are the Notion User (the “Resource Owner” in the spec), the Django web app (the “Client”), the user’s browser (”User-Agent”), and Notion (the “Authorization Server”). Implicit in any action the user does is that it’s done via the browser. One detail that people sometimes miss when first looking at OAuth flows is that some parts are handled by browser redirection, rather than REST API calls - it’s an important distinction!
The major steps of the flow in this tutorial are:
- The user does something in the Django app to request authorization, such as click a button or navigate to a specific page.
- The Django app redirects the user’s browser to the Notion Authorization endpoint, providing app details in the query parameters.
- The user sees a page provided by Notion which allows them to approve (or reject!) the app and connect specific pages.
- Notion redirects the user’s browser back to the Django app, specifically the route specified by the Redirect URI, with an authorization code and optional state.
- The Django app makes an authenticated POST request to Notion’s token endpoint, to exchange the authorization code for an access token.
- Notion responds with an access token, and some additional information about the user.
- The Django app can then save the access token and other information, and use it to make API requests.
Notion returns access tokens which do not expire. A typical user would only have to go through this authorization flow once per integration.
The Notion documentation on authorization breaks down the steps with raw HTTP request examples. If you’d like a broken down Python example without an OAuth library or a web framework, check out Norah Sakal’s post on How to create a public Notion integration, which goes through the process manually in a Jupyter Notebook with some cutting and pasting required. This tutorial covers a practical example of an OAuth integration, but doesn’t break down the steps quite as much and URLs are constructed using a library.
Django Project Setup #
This part will get you set up with a Django project. If you’re totally unfamiliar with Django, you might want to take a look at the official Django tutorial, if you’re a Django veteran feel free to do things your own way!
- Create a venv and install Django into it. Depending on your system, Python may be either python or python3. This tutorial was created using Python 3.10.4 and Django 4.1.2.
# Windows Command
****python -m venv .venv
.venv\scripts\activate
python -m pip install Django
# Mac/Linux
python3 -m venv .venv
source .venv/bin/activate
python3 -m pip install Django- Create a new Django project, and run it to ensure it’s working. We’ll use
oauth_tutorialas the name, and create it in the current directory,..
django-admin startproject oauth_tutorial .
python manage.py runserverThis should create manage.py and a folder called oauth_tutorial in your current directory - if you omit the . both will end up in a folder called oauth_tutorial. You should now be able to go to the development server address (usually http://127.0.0.1:8000/) and see the Django default page.
The oauth_tutorial folder contains overall project configuration, in particular, we’ll be coming back to settings.py and urls.py. In the top level folder, manage.py gives you access to many commands useful during development.
Django can be configured to run using several database backends, but by default it will use sqlite3, which doesn’t require extra configuration. You’ll see a db.sqlite3 file which will hold the database. We won’t be using the database directly in this tutorial.
Install requirements and add settings #
We have a couple other pre-requisites needed for our basic OAuth flow: oauthlib, which helps with some of the OAuth logic, and requests to make API requests.
pip install oauthlib requestsDjango stores settings in a python file, by default, settings.py in your project folder, which if you’ve followed the naming conventions is oauth_tutorial.
Add an import for os and create the following settings variables to oauth_tutorial/settings.py.
# Import os near the top
import os

# Add these lines at the bottom
NOTION_CLIENT_ID = os.environ.get("NOTION_CLIENT_ID", "")
NOTION_CLIENT_SECRET = os.environ.get("NOTION_CLIENT_SECRET", "")
Optional: Set up python-dotenv for environment variables #
I prefer to use a .env file and load_dotenv to manage my development environments, however, you can set your environment variables in the system if you prefer. To use a .env file, you need to pip install python-dotenv, create a .env file (it can be empty for now!) in the same directory as manage.py and load the variables in manage.py.
In manage.py, load the import and run load_dotenv at the beginning of the main method.
# more imports
from dotenv import load_dotenv

def main():
    load_dotenv('./.env')
		# rest of the code
Ensure that you are still able to run the server using python manage.py runserver.
Create a Public Notion Integration #
Create a new integration at https://www.notion.so/my-integrations; give it a name. For this tutorial, the specific capabilities aren’t important; I suggest just giving “Read Content” permissions. Once you hit submit, it will be created as an Internal integration, so the next step is to turn it into a Public integration under Integration type.
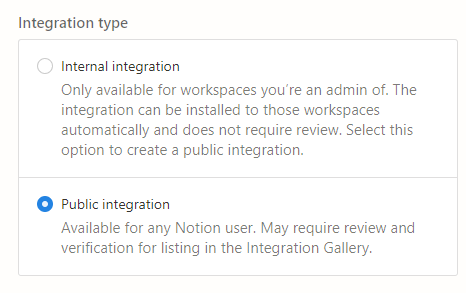
The Integration Type section of the Integration page. Choose Public Integration.
Once you do that, you should see an “OAuth Domain & URIs” section below Capabilities.
The important field here is “Redirect URIs”. Redirect URIs are used as part of the OAuth flow to send users back to your application and complete the process. For development, assuming your Django site is running at the default of http://localhost:8000, set the redirect URI to http://localhost:8000/notion/redirect.
Most of the rest of the fields are required, but can be filled in with placeholders - the URLs must be valid URLs but can point to localhost, so I chose things like http://localhost:8000/privacy. The “URL to Notion template” option has just recently been added and is optional; it’s useful if your integration works with a template, but we won’t use it for this tutorial.
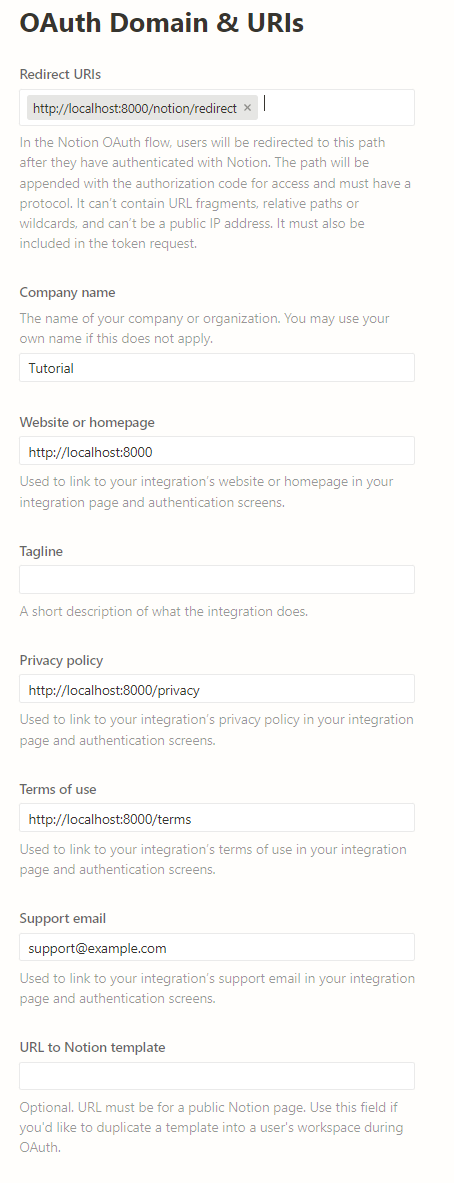
The OAuth Domain & URIs section of the Integration page. Most fields are required, but unimportant for this tutorial, however, there must be a Redirect URI that matches the route we will set up.
Copy the “OAuth client ID” and “OAuth client secret” into your .env file or set environment variables. Your .env file should look something like this:
NOTION_CLIENT_ID=1bb35345-2a5d-4ca1-ac5d-16f22dafe3df
NOTION_CLIENT_SECRET=secret_X**************************
Create Django App & Views #
Next we need to create a Django app to handle the Notion OAuth logic, and create the views to handle the OAuth flow. Apps in Django are modules used to group related functionality. For example, the OAuth logic might be separate from the rest of your business logic and could be easily re-used in different projects.
Create an app called notion_oauth using manage.py:
python manage.py startapp notion_oauthFor now, most of the files there are boilerplate and placeholders. The main logic will live in views.py, while we’ll use urls.py to define routes to access those views.
We also need to tell Django to use the app in oauth_tutorial/settings.py. Add 'notion_oauth' to the list of INSTALLED_APPS.
INSTALLED_APPS = [
    'django.contrib.admin',
    'django.contrib.auth',
    'django.contrib.contenttypes',
    'django.contrib.sessions',
    'django.contrib.messages',
    'django.contrib.staticfiles',
    'notion_oauth'
]
Create view to start the OAuth flow #
We ultimately need to create two different views for different parts of the OAuth flow. The first view will handle generating the URL to redirect the user’s browser to the Authorization endpoint.
We will use oauthlib’s WebApplicationClient to help make a URL with the correct format, and use Django’s redirect shortcut function to redirect the browser to this URL. Replace the default notion_oauth/views.py with:
from django.shortcuts import redirect
from django.conf import settings

from oauthlib.oauth2 import WebApplicationClient

server_url = "http://localhost:8000" # The URL of this server
redirect_uri = f"{server_url}/notion/redirect"

authorization_base_url = 'https://api.notion.com/v1/oauth/authorize'

def notion_auth_start(request):
    client = WebApplicationClient(settings.NOTION_CLIENT_ID)
    authorize_request_url = client.prepare_request_uri(
        authorization_base_url, redirect_uri)
    return redirect(authorize_request_url)
prepare_request_uri uses information provided in the client and in it’s parameters to make a URL like this: https://api.notion.com/v1/oauth/authorize?response_type=code&client_id=1bb35345-2a5d-4ca1-ac5d-16f22dafe3df&redirect_uri=http%3A%2F%2Flocalhost%3A8000%2Fnotion%2Fredirect
We then need to map a URL to the view in a urls file for the app, Create a file notion_oauth/urls.py with the code below:
from django.urls import path

from . import views

app_name = 'notion_oauth'

urlpatterns = [
    path('', views.notion_auth_start, name='notion_auth_start'),
]
And then we need to include the app’s URLs in the root URL configuration in oauth_tutorial/urls.py.
from django.contrib import admin
from django.urls import path, include

urlpatterns = [
    path('admin/', admin.site.urls),
    path('notion/', include('notion_oauth.urls'))
]
This combination of paths means we’ve set up the view at http://localhost:8000/notion - the urlpatterns in notion_oauth/urls.py are included under notion/.
At this point, if you run your server, python manage.py runserver, we should be able to start the OAuth flow by going to http://localhost:8000/notion, which will go through multiple redirects and end up at page on Notion’s end asking the user to approve the app and select which pages to connect.
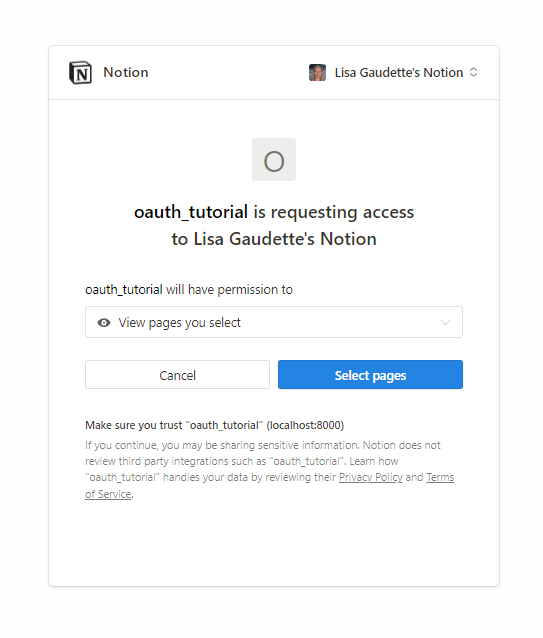
The Notion page asking for the user to approve the app and select pages to connect.
But after going through the Notion steps, you will get a Django Page Not Found error page as we haven’t set up the view for the redirect URI, so let’s do that next!
Create view for Redirect URI to complete OAuth flow #
Once the user has authorized the app with Notion, Notion redirects the browser back to the redirect URI, with an authorization code that the app needs to exchange for an access token. To do this, we’ll create a second function view called notion_redirect in notion_oauth/views.py.
In this function, we use oauthlib to parse the request URL to retrieve the authorization code and prepare the URL, headers, and request body for the token request. We then use requests to make a request authenticated with the client ID and secret to retrieve the access token, and for this example, we simply display the response.
# Add these imports to the top
from django.http import HttpResponse
import requests

# Add token_url after authorization_base_url
token_url = 'https://api.notion.com/v1/oauth/token'

# Add this function to bottom
def notion_redirect(request):
		# oauthlib needs the complete uri with host name
    url = request.get_full_path()

    client = WebApplicationClient(settings.NOTION_CLIENT_ID)
    client.parse_request_uri_response(url) # Extracts the code from the url

		# Creates the URL, headers, and request body for the token request
    token_request_params = client.prepare_token_request(token_url, url, redirect_uri)

		# Makes a request for the token, authenticated with the client ID and secret
    auth = requests.auth.HTTPBasicAuth(
        settings.NOTION_CLIENT_ID, settings.NOTION_CLIENT_SECRET)
    response = requests.post(
        token_request_params[0], headers=token_request_params[1], data=token_request_params[2], auth=auth)

    return HttpResponse(response)
And like before, we need to add this view to the urlpatterns in notion_oauth/urls.py. Note that, combined with the top level urls.py, this puts the redirect uri at http://localhost:8000/notion/redirect - this must match what you have configured in Notion.
urlpatterns = [
    path('', views.notion_auth_start, name='notion_auth_start'),
    path('redirect', views.notion_redirect, name='notion_redirect'),
]
Final touches #
Ensure your Django server is running, python manage.py runserver
At this stage, if you run it and go to http://localhost:8000/notion you should be prompted to accept the integration, but when you get to the final redirect step, you will end up with a Django error page for InsecureTransportError with a message about “OAuth 2 MUST utilize https.". This is oauthlib defaulting to secure. For the purposes of local development, we can add an environment variable, OAUTHLIB_INSECURE_TRANSPORT=1to the .env file to bypass this check. Please make sure to use HTTPS appropriately in production though!
After adding the environment variable, and re-starting the server, you should now be able to go to http://localhost:8000/notion, approve the integration, and get JSON response that looks something like below when nicely formatted. Note the access token in particular is a secret, I replaced all of the sensitive values!
{
    "access_token": "secret_c3VwZXJzZWNyZXRhY2Nlc3N0b2tlbnN0cmluZ29mbGV",
    "token_type": "bearer",
    "bot_id": "f97139e5-497b-4afe-9b4d-18a66fad6c99",
    "workspace_name": "Your Name's Notion",
    "workspace_icon": "https://lh3.googleusercontent.com/a-/c3VwZXJzZWNyZXRhY2Nlc3NkMgo22tlrQiDIcWp3Dc5Yw=s100",
    "workspace_id": "742c598c-261b-40f2-bad7-6c1ae5eeb77d    ",
    "owner": {
        "type": "user",
        "user": {
            "object": "user",
            "id": "060997e8-88a5-4e41-8ff0-15be8811a215",
            "name": "Your Name",
            "avatar_url": "https://lh3.googleusercontent.com/a-/c3VwZXJzZWNyZXRhY2Nlc3NkMgo22tlrQiDIcWp3Dc5Yw=s100",
            "type": "person",
            "person": {}
        }
    }
}
Aside from the access_token and token_type values, this adds some additional information to a standard token response. Notion suggests that you save all of this extra information, even if you don’t intend to use it right away.
What’s next? #
The full code repository is available on Github, in the part_1 branch: https://github.com/lgaud/oauth_tutorial/tree/part_1.
This tutorial has covered the very basics of setting up a Notion OAuth integration, but it’s definitely missing some pieces to be a functional app. In part 2, we make a nicer user experience, save the token and other information, and use the token to call an API to display some information in Django!